After the success of the first retr0bright, I was confident I had everything I'd need to get this computer looking the way I want it. The 40 Volume Creme is definitely the way to go.
With that, it was time to brighten the rest of the chassis as well as the Canon P101-D calculator.
I woke up extra early since the sun was supposed to rise around 5:30 AM. I wanted to maximize the amount of time everything would be exposed for the best results. Unfortunately, because of the position of my porch, the sunlight was nowhere near available. I waited a few hours and finally had some light to work with.
And this is where I started to find problems with this method. There are a lot of trees around me, and there's another porch above mine. Because of the narrow area of sunlight I get each day, I had to move everything every half hour or so. This was very annoying.
But I persisted, and found that my porch gets a total of about 2 hours of sunlight during the day. Most videos I've seen of successful retr0brights have their parts out for six to twelve hours.
Here's a comparison shot of the bottom of the Vic-20 case. The first brightening attempt was great, but the second didn't make much of a difference. It seems retr0brighting has diminishing returns, so I would need a way to keep everything in direct UV light for an extended period of time.
But it wasn't all disappointment. Here are comparison shots of the other parts.
The difference between before and after with the calculator was incredible. The dark orange has become a light shade of pink. It has a long way to go before it's back to normal, but I was happy with the results of just a few hours of sunlight.
The top of the chassis looks WAY better now. Most of the yellowing is gone, and the ugly stain on the left side is completely gone.
Also, one of the most concerning parts of the case looks significantly better.
Still, this wasn't enough to satisfy me, so I needed to take drastic measures to get this case looking fantastic. Tune in to Retr0bright Phase 3 some time next week.
Moving on from that, I made a shocking discovery about the keys of the Commodore 64: they aren't all the same.
As you can see, the slope of the top changes between the f keys. Did this also mean that the other keys were different?
Yes, it did. I was mistaken when I thought the key I 3D printed from Thingiverse wasn't accurate. It turns out it was the same as the top row. This means I'll need to design two more keys-
A while back I attempted to retr0bright a disgustingly oranged calculator. It did not work. I used 40 volume hair creme, which has a lot of hydrogen peroxide, the key ingredient in making things whiter. Vintage enthusiasts swear by the stuff, so I pick up a gallon of it from Sally Beauty for like $10. The mistake I made when attempting to de-orange that calculator was I never left it in the sun. It turns out you need ultraviolet light to activate the hair creme.
So with today's post, I want to revisit that device as well as move forward with the Commodore Project 64.
I think the bottom of the Vic-20 place is the best place to start. It's the worst-looking part of the chassis, but if I screw it up, the damage won't be visible from above at least. I began by removing all of the rubber feet and then used a heat gun to cleanly remove the product sticker. I also scrubbed all of the parts with soap and water, and used an abrasive pad to remove any marks.
Removing the sticker revealed the true color of the Vic-20 chassis. This would help me figure out when the case was looking the way it should. With this point of comparison, I brushed the 40 volume creme all over the surface and laid clear plastic wrap over that to keep debris from getting in it.
This went outside onto my porch, which only gets a few hours of sunlight each day.
I had to move it twice over the following hours so it would always be in direct sunlight. I also rotated the piece so that every area would be affected.
And here's the result of the first phase:
The difference is huge. The yellowing was reduced significantly. I'm pretty happy with the results so far, but there's still work to be done.
While cleaning the top of the chassis, I found some nasty damage had been done to the vent. I believe this was caused by a candle because I've also found wax between some of the keys and in other parts of the chassis. My guess is a candle fell over onto this machine at some point in the past.
It's unfortunate to see this kind of damage, but I'm hoping the retr0bright will lighten that area up and make it less noticeable.
In Phase 2, I'll be doing the entire case as well as that ugly orange calculator. Thanks for reading!
If you're interested in retr0bright, here are some places to start:
Hello, and once again, sorry for the lack of content. I've been busy with several projects and haven't had much motivation to work on calculator reviews. The original joke was that the calculator reviews would all pretty much be the same, but the reality is that joke isn't very funny after several months. That doesn't mean I won't be doing more calculator reviews, but they will be less common and will be for devices that have something notable about them.
I follow several vintage electronics enthusiasts on YouTube and have found their projects to be fascinating. It has inspired me to build a custom Commodore 64 computer of my own. I have several working machines and one that does not work at all. The shell of that one was re-purposed for a retro gaming machine powered by a Raspberry Pi.
Commodore 64 Assy 326298 Rev A, from 1982.
That left me with a board that didn't function. I've replaced the capacitors and swapped out most of the chips for tested working ones, but it still won't give me anything more than a black screen. I've even tried using the Commodore 64 Dead Test cartridge, but even that won't give me any sort of output.
The Commodore Dead Test cartridge.
I've given up on this machine several times, but I don't have the heart to get rid of it. I want to figure out what's wrong and have it up and running again. Sure, I could just get another board, but I'm interested in the challenge of making a 37 year-old machine working again.
So I have dubbed this my Commodore Project 64. I want to turn it into a custom computer with features my stock computers don't have. I personally prefer the original machines, but I want to have some fun with this. The one rule I want to stick with as best I can is that I will only use parts from original machines that are beyond repair and would likely never be used for regular machines again.
I was inspired by Adrian Black's Creamy Dreamy C64:
He used a Commodore Vic-20 case for a very beautiful end result. So with that, I hunted down the worst Vic-20 case I could find on Ebay.
Commodore Vic-20 Case.
This thing is a mess.
The good news is that the case itself isn't broken, just very gross. Several keys are missing, but that's okay because I've got a plan for those.
One of my favorite creators on YouTube, Perifractic's Retro Recipes, built this amazing machine. Since he wanted to only use parts that were recently manufactured, his options for keys were limited. He went with Lego Bricks, which is a neat idea, but I personally hated that.
So I've been designing 3D printed keys to be used on my Commodore Project 64. This part alone has proven to be a grueling process. Some people have attempted to replicate these keys, but I don't like how they've turned out.
The leftmost blue key was my first print of a C64 key, and it came from a user by the name of Yangsong on Thingiverse. Click here if you want to get a look at the CAD files. The key looks and functions nicely, but it's not quite right for the Commodore 64. It may be a different design that user is basing it on, but I don't know for sure. The mess on the inside is just printing supports I haven't bothered to remove because they have no effect on the end result.
The key in the middle is my design so far. The dimensions are much closer to the keys I'm working with.
Here's a view of the key in CAD. It's still not to my liking, but I've been making adjustments and printing it over and over and getting closer to something amazing. I do want to make the design publicly available when it's finished so that others can print their own keys.
So this is where I am now with the project. The Vic-20 case needs to be thoroughly cleaned and retr0brighted. Now that my area is getting sun, I should have better luck with that. The 3D printed keys need to be refined and I'll need to figure out what sort of color scheme I want to go with. And of course, I need to get the board working again.
In the meantime, I'd like to post occasional updates on this project. I've got more parts and things I'll need ordered but it could be several months before I have all of them.
Note: I am not sponsored by anyone, but I want people to know where they can find this kit.
When I realized I wanted to take my calculator collection more seriously, I ordered the KKMoon DIY Calculator Counter Kit from Amazon. It was only $15 and seemed like a fun project. The parts ended up sitting in a box in my closet for several months but this past weekend I decided to sit down and finally put the thing together.
KKMoon DIY Calculator. Fully assembled.
The KKMoon DIY Calculator Counter Kit turned out to be a lot of fun to put together and had some very cool surprises within. The manual includes a link to a page with instructions on how to build it: http://www.diyleyuan.com/jc/L8Q.html. The images on the page are very clear and easy to follow. Each component feels well-made so the only way you're going to mess things up is if you do something really stupid.
Unfortunately, the acrylic case proved to be an agonizing endeavor. Peeling off the protective covers on each piece was easily the worst part of this entire experience. The second worst part was assembling the keys, which use tiny pieces of paper you have to cut out. The buttons look terrible.
It took me two hours to build, and the end result is pretty cool. You can see inside the device and with the exception of the buttons, the calculator looks great. The display is bright and back lit, unlike any other device in my collection.
While the buttons look ugly, they feel fantastic. They're loud and clicky and extremely responsive.
In addition (haha) to the basic mathematical functionality, this device is also capable of determining the resistance of resistors by inputting the color rings. I haven't had much luck with this and I don't know why. Maybe the resistors I was looking at used a different system?
You can also use this calculator to determine the needed resistance to use an LED by inputting the source voltage and the working voltage of the LED.
Hex calculator in action.
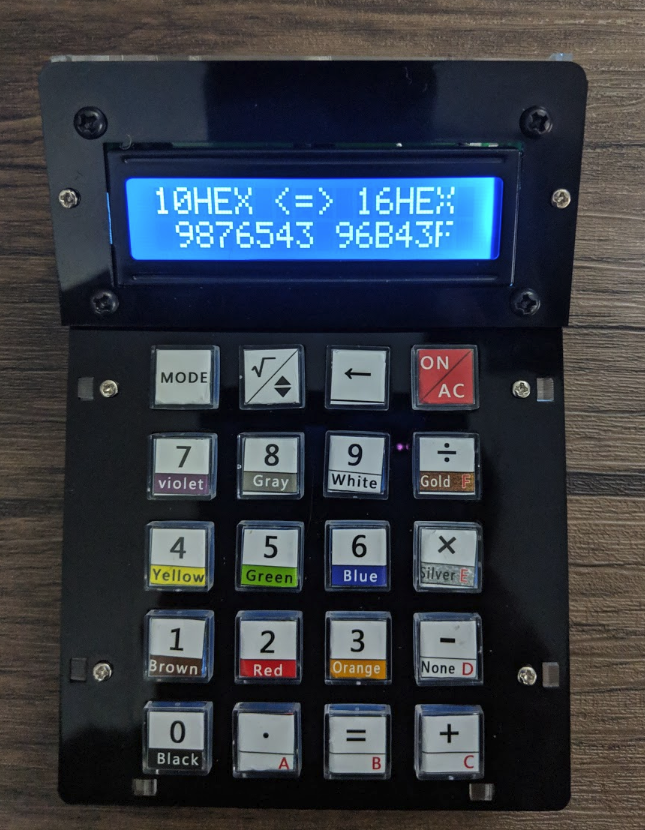
But my personal favorite feature is the hex calculator. This mode lets you input a value and it will return it in hexadecimal. This is extremely useful for me as a computer science student and a very pleasant surprise.
One of the two CR2032 batteries. Impossible to access without disassembling entire device :(.
Except for the hex calculator, the only thing that makes this device stand out is the fact that I built it myself. I don't really like the way it looks, and the two CR2032 batteries can only be accessed by disassembling the entire device, which is not a trivial task. I fully intend to modify this calculator in the future, so there will be more content about it.
Here's the complete build video. It's two hours long and probably very boring.
Basic calculation. Display has a minor defect that affects the second from last digit.
This device is incapable of calculating very large numbers.
The Star Wars Episode IX trailer has been revealed to the world, and I've been waiting for this day specifically for this calculator review. This isn't my first Star Wars calculator review, but it's definitely the one I've been excited about the most.
Tiger Star Wars A-Wing.
The first Star Wars film I ever saw was Episode VI: Return of the Jedi. Even without the context of the first two films, I found myself captivated by the idea of a civilization far away that viewed space travel as completely mundane in the way that we see cars and airplanes. I was also young so I thought the Ewoks were great and C-3PO was an acceptable form of comic relief. I still love these things.
Yes, of course it's a calculator.
So here is my Tiger A-Wing, which is also a calculator. Honestly, I don't know why it's a calculator. The calculator part is completely unremarkable but it's the sole reason I'm even discussing this toy here on my website. I don't even really want to talk about the calculator because I've got nothing interesting to say about it. It works, sort of. There's a problem with the display. I don't care.
Tiger is mostly known for its line of simple electronic games, so it's odd that they would bother turning a ship into a calculator. They also made a Millennium Falcon-shaped electronic game that I've never touched. Maybe they didn't think the A-Wing was cool enough to get its own game.
Like most Star Wars toys, it's not expertly detailed or anything. It looks fine, which is good enough for me. It can make a few sounds too and they of course don't sound great. The guns on the side rotate.
I might sound like I don't particularly care for this calculator, but I really do. I'm just trying not to let my love for Star Wars affect the review too much. I like this calculator a lot, but mostly because I just like spaceships.
This device was released way back in 1997, but I found it on Ebay for about $7.
Interestingly, this device is nearly the same scale as the Micro Machines Millennium Falcon.
Searching thrift shops and other stores for calculators is one of the most rewarding aspects of calculator collecting. When I first started getting serious about collecting, I bought just about anything I found to make the collection grow as quickly as possible. I ended up with a lot of very boring devices because of this. But in my searches, my heart sometimes skips a beat when I discover something truly unique.
Sharp Elsi Mate El-120.
The Sharp Elsi Mate EL-120 was one such find. I had never seen anything like it before. It features a horizontal design, three digit display, and a button that says "count." I cannot explain the design choices.
Before I get into its interesting functionality, I want to address the overall aesthetic. This calculator looks awesome.The red and black color choice makes it look more like an old portable computer than a simple calculator. It uses the gorgeous green LED display that I love so much in early electronic calculators. It's a very sturdy device that simply looks fantastic despite adhering to zero typical design choices.
This button adds one.
The unique look it has raises several questions for me, most importantly: what is this for? Only being able to display three digits at a time makes this less useful for routine calculations than a standard eight digit device. The count button adds one to whatever number is displayed, so this would be useful for counting things one at a time I guess. But the position of that button isn't ideal for how you would normally hold this calculator.
To view the display while using the count button, you have to hold it in a very awkward position. It's not extremely uncomfortable, but if you're counting for a long period of time I imagine you'd get some serious wrist cramps.
The EL-120 comes from Japan in the year 1973. I found it at a thrift shop for $5. It's not a device I have any real need for, but if you have any idea who would benefit from this design, please let me know.
Calculator inside original box.
Bottom of box.
Back of calculator, batteries removed.
Back cover removed, exposing internal components.
LED display and components exposed.
I didn't want to remove this and risk letting the buttons fall out.
Hello again! I apologize for the lack of reviews, but I've dug myself into many other projects unrelated to calculators. The April 1st post had been set up a while back, and was posted automatically, so if you're confused as to why that's the only thing I've posted lately, there's why. But we're not here to talk about me, are we? We're here to discover how good a calculator is.
Sentry CA279 Dual-Power Calculator.
The Sentry CA279 Dual-Power calculator comes to us from the year 2011 by a company that makes audio technology now, Sentry Industries. There are no mentions of calculators to be found on their website, but based on the logo, it appears to be the same company. I don't know why they would try to distance themselves from this device because it's actually decent- for a cheap calculator.
The CA279 has extremely basic functionality and doesn't feature anything unique as far as calculators go. It adds, subtracts, multiplies, and divides integers and floats just fine, and it helps that the rubber buttons feel nice and the display is so large. It's dual-powered as well, and the one I purchased came with a corroded battery and still works.
I like the way it looks, and it feels pretty good in the palm of my hand.
Inside the device is unfortunate, however. This calculator is made from very cheap components, similar to the Big Display that I hate so much. The difference here is that the internal components are held together nicely and the exterior plastic probably won't crack after being gently tossed into a hard surface.
Is it a device I would recommend? Not really. Is it a device I'd warn my readers to not buy? Not that either. It's cheap but not disposable. I just don't have any strong feelings one way or another about the CA279. It won't be going into my Box of Lame™, and I've got plenty of room on my Wall of Fame, so it will go up there among other great devices until I find a reason to remove it.